Here are the steps.
1. Open the image in photoshop.
2. Go to "Image", "Mode", "LAB Color".
3. Then go to "Image", "Apply Image".
4.Then with the Apply Image window choose
Layer: Background
Channel: LAB
Blending: Multiply
(You can then adjust the opacity to the color that you desire. I left it at 100% just to show the dramatic effect that this would have on the image.)
5.Press OK and then in "Image", "Mode", RGB or CMYK which ever you need for web or print.
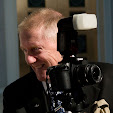
 LAB Color adjusted image
 Original Image
He did a great job on this image and has been showing me up royally with his new skills.